Transmittals Manager - How are Transmittals created?
How are Transmittals created?
Transmittals are created or sent automatically in four different scenarios as detailed below:
When sharing selected plans/files (automatically sent)
When sharing document folders (automatically sent)
When plans/files are added or superseded in a document folder (automatically prepared)
For plan/file changes in bid packages (automatically prepared)
Send transmittals when sharing selected plans/files (automatically sent)
Send transmittals when sharing selected plans/files (automatically sent)
After you elect to share individual files with your project team members or contacts from outside your organisation, a transmittal email notification is automatically generated containing a transmittal pdf file and a button to download all related transmittal plans/files.
To share selected plans or files from a folder, send a transmittal and view the related transmittal record, follow the steps below.
Note: sharing individual files with contacts will not give them access to your entire document folder, only to the files that you shared.
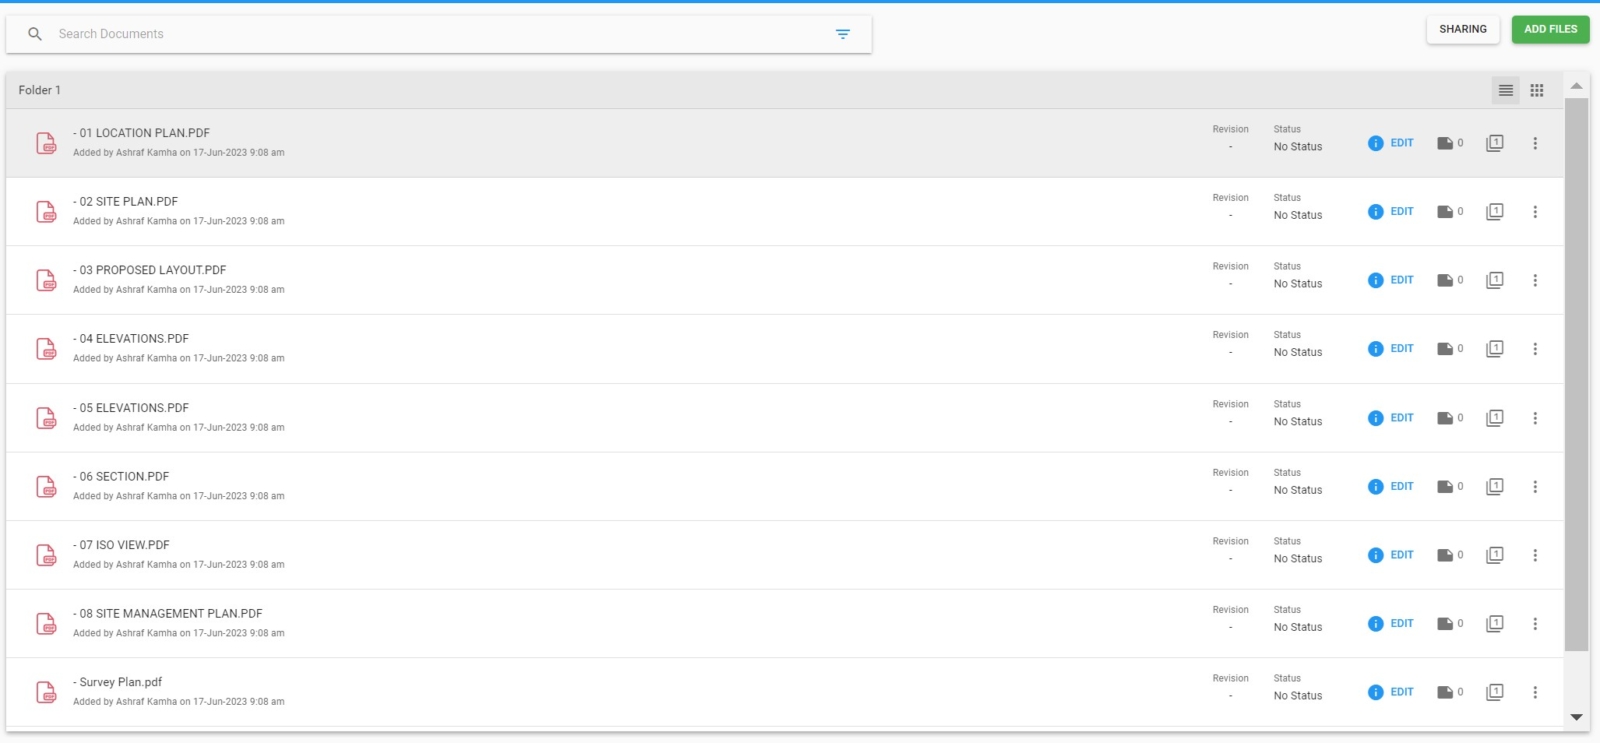
Step 1: Go to documents and click on a folder
Go to your project documents and click on a folder.
Step 2: Select a file
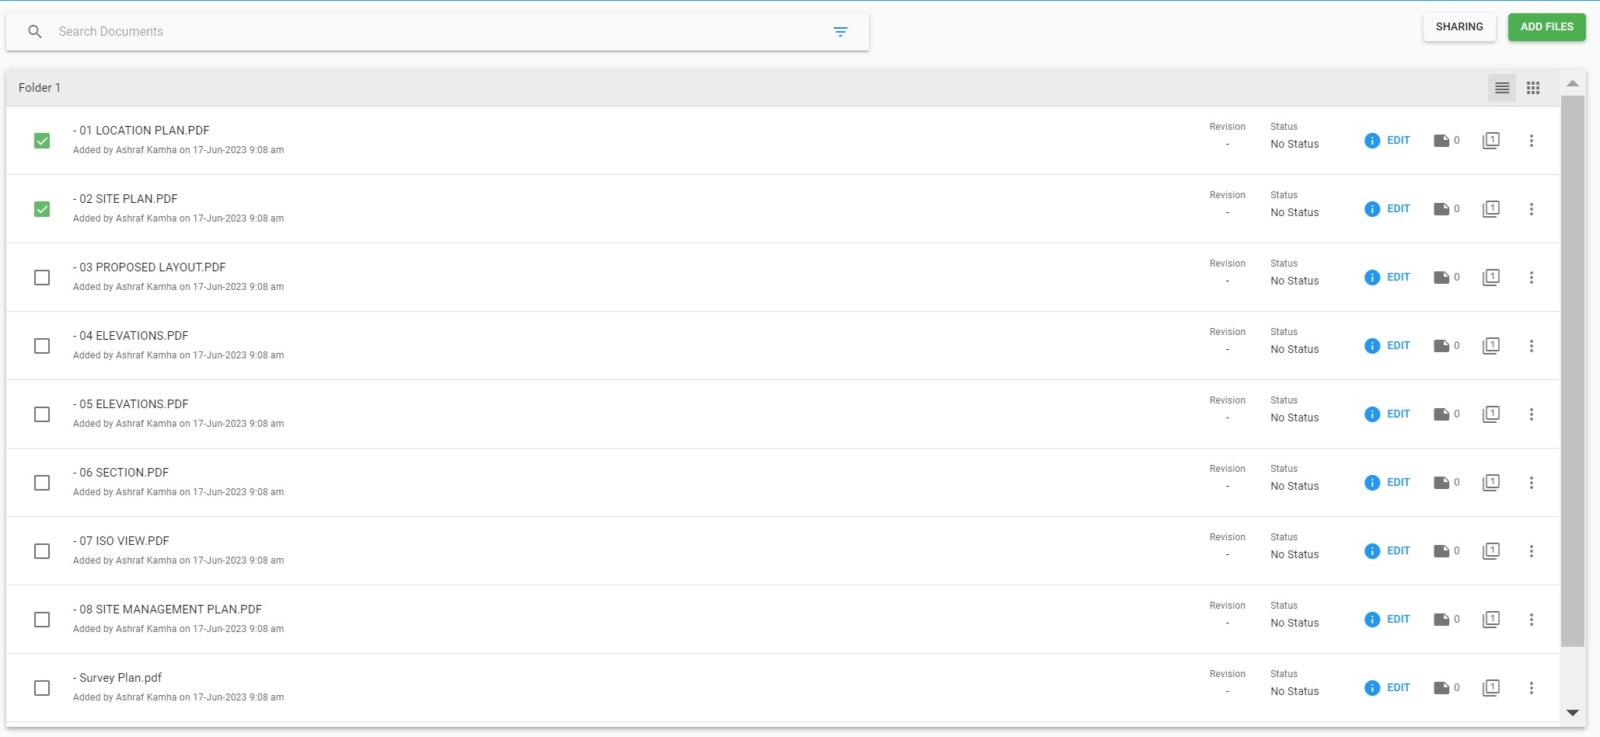
Hover over a file and click on the checkbox to the left-hand side of the document code to reveal the bottom toolbar.
Tip: You can select all files in your folder by clicking on the checkbox on the left-hand side of the bottom-toolbar.
Step 3: Click “SHARE”
Click on the “SHARE” button on the bottom toolbar to share your selected files.
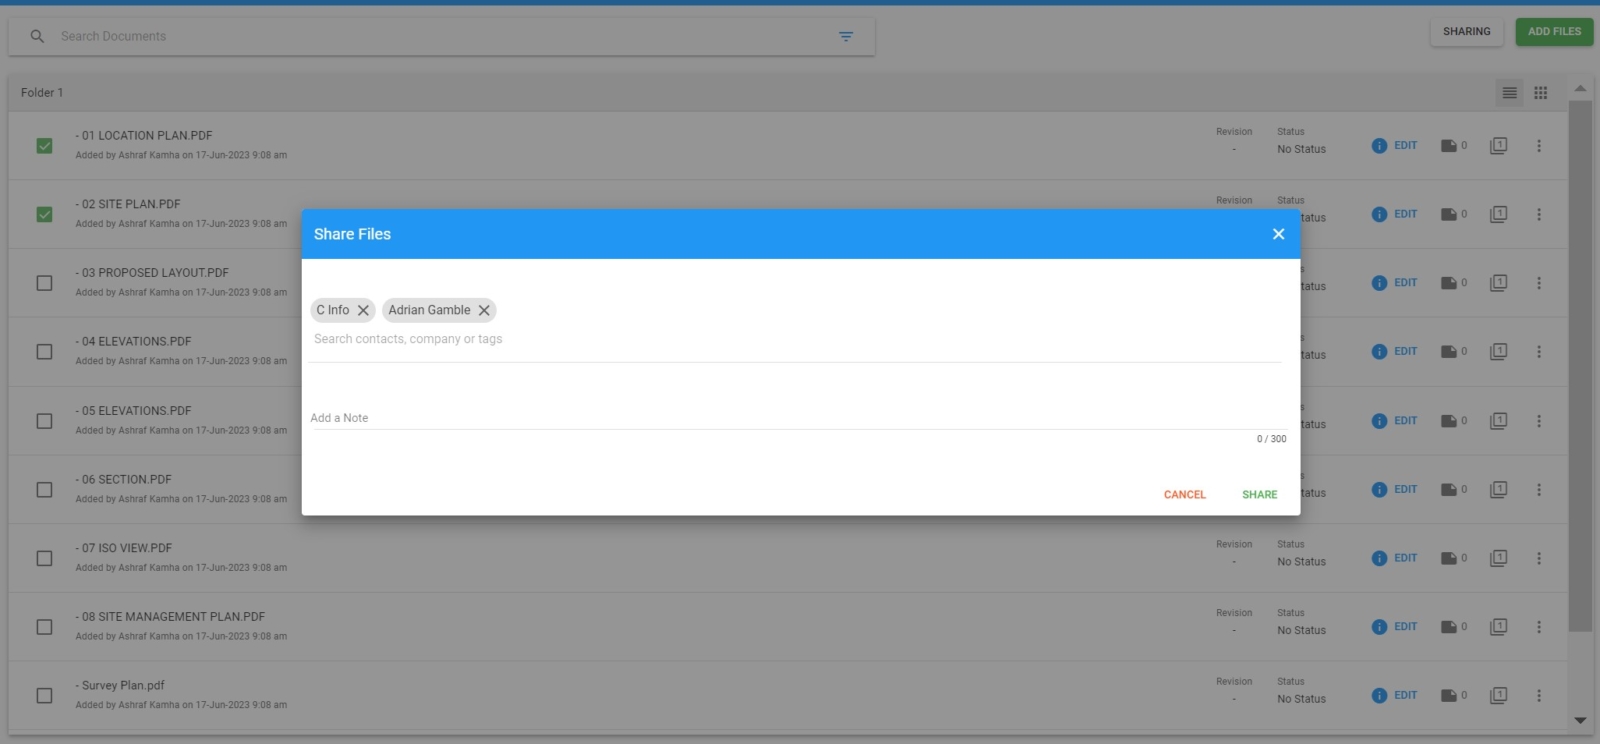
Step 4: Select contacts and add a note
Add one or more contacts you would like to share your selected files with by typing into the search field and selecting them from the list.
You can then add a note and click the “SHARE” button to finish sharing.
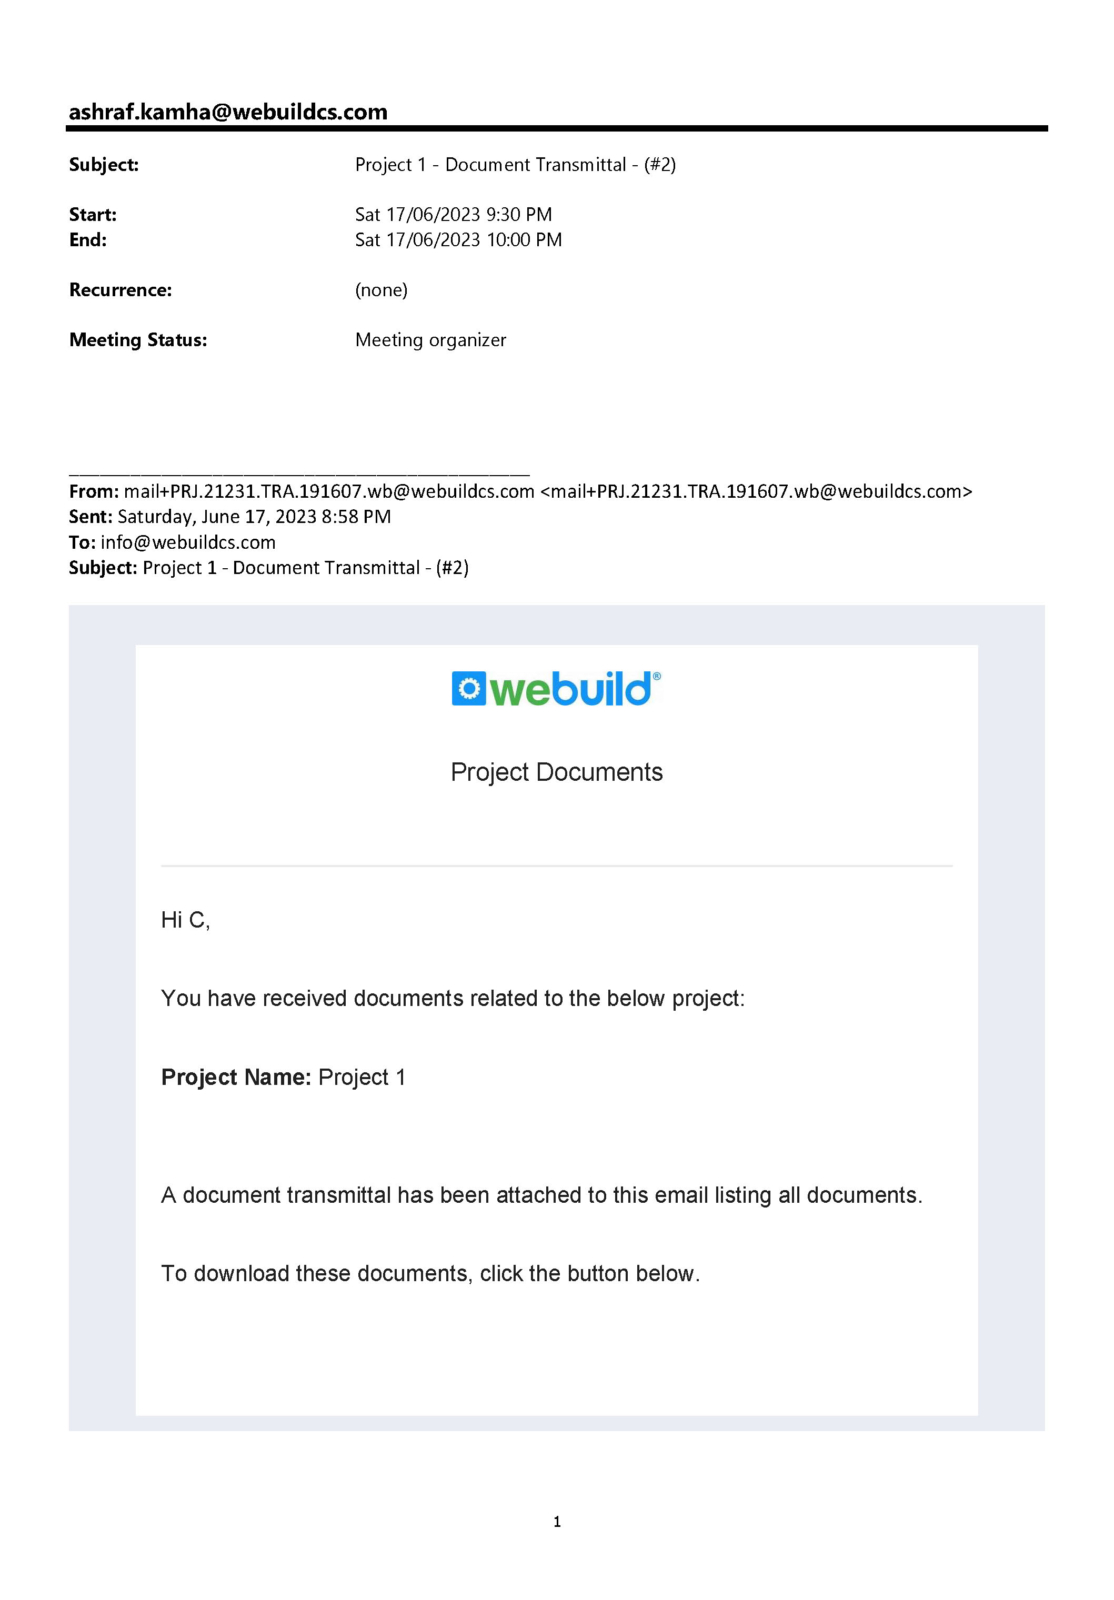
Step 5: File share transmittal notification
After you share one or more plans/files, each contact receives an email notification like the one in the example below.
Recipients can click the “DOWNLOAD DOCUMENTS” button to download all related files and folders, or click “View Transmittal Details” the transmittal information and related files via the interface.
A record of the related transmittal is added to the “Sent transmittals” folder of your Transmittals module with all information, including a date/time stamp for download activity.
Note: users without Webuild accounts will be able to access files online via a “guest mode” interface with limited access.
Example: Transmittal pdf file
Step 6: Go to your transmittals manager
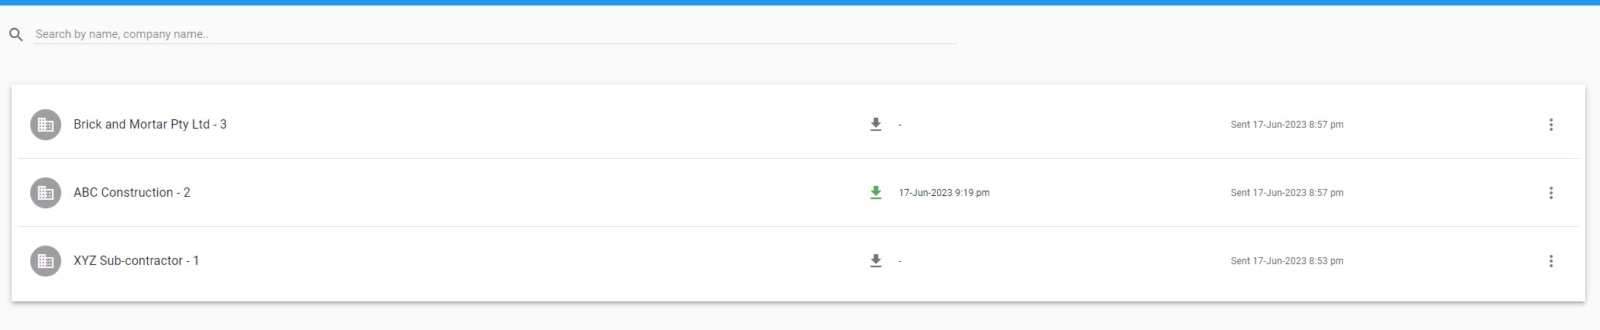
Navigate to your Transmittals Manager to view the related sent transmittal record.
Step 7: View transmittal record
Click on the “Sent Transmittals” folder, then click on the related transmittal.
The most recently sent transmittals will appear at the top of the list, with the company name, transmittal number and date sent displayed.
A “viewed” date stamp is displayed which appears after recipients either download the transmittal files or view them online.
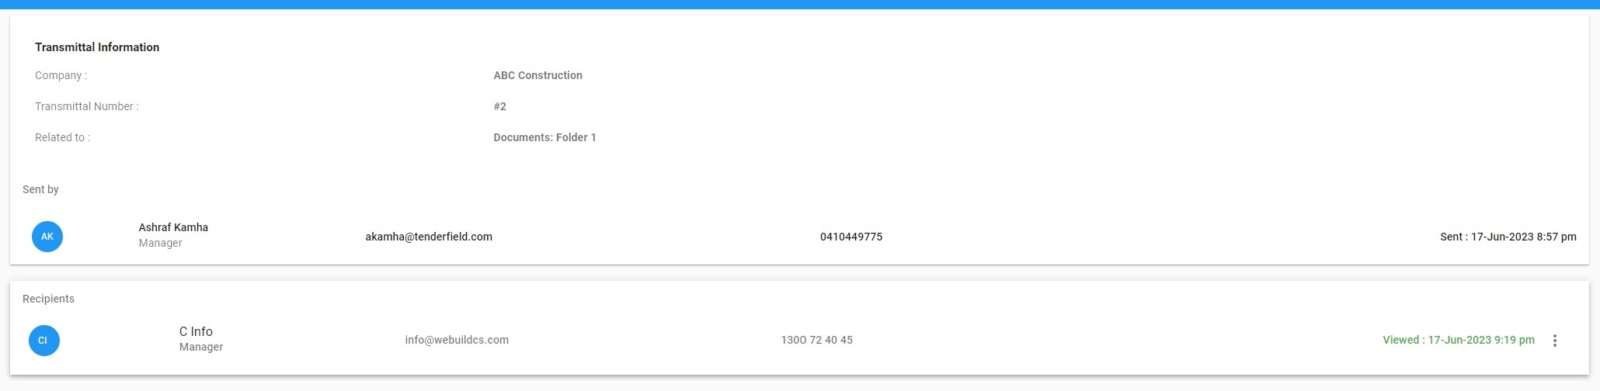
After clicking into the transmittal, you will see an “INFORMATION” and “TRANSMITTAL RECEITS” tab AND “TRANSMITTAL FILES” tab.
The “INFORMATION” tab displays the sender/recipients and other details.
“TRANSMITTAL RECEITS” tab displays the time and date stamp when the recipient downloaded the transmittal documents. You can download and save the receipt if you want by clicking the floating dots to the right of the receipt.
The “TRANSMITTAL FILES” tab displays all plans/files that relate to the transmittal. Each file can be viewed online by clicking them.
Send transmittals when sharing document folders (automatically sent)
Send transmittals when sharing document folders (automatically sent)
After sharing selected document folders with your project team members or contacts from outside of your organisation, a transmittal email notification is automatically sent containing a transmittal pdf file and a button to download all related transmittal plans/files.
To share whole document folders, send a transmittal and view the related transmittal record, follow the steps below.
Step 1: Share folders
To learn how to share document folders, see the Document Management section of the User Guide.
Step 2: Go to your transmittals manager
Navigate to your transmittals manager to view the related sent transmittal record.
Step 3: View “Sent Transmittals” record
Click on the “Sent Transmittals” folder, then click on the related transmittal.
The most recently sent transmittals will appear at the top of the list, with the company name, transmittal number and date sent displayed.
A “viewed” date stamp is displayed which appears after recipients either download the transmittal files or view them online.
After clicking into the transmittal, you will see an “INFORMATION” and “TRANSMITTAL RECEITS” tab AND “TRANSMITTAL FILES” tab.
The “INFORMATION” tab displays the sender/recipients and other details.
“TRANSMITTAL RECEITS” tab displays the time and date stamp when the recipient downloaded the transmittal documents. You can download and save the receipt if you want by clicking the floating dots to the right of the receipt.
The “TRANSMITTAL FILES” tab displays all plans/files that relate to the transmittal. Each file can be viewed online by clicking them.
Send transmittals for document folder additions/new versions (automatically prepared)
Send transmittals for document folder additions/new versions (automatically prepared)
After sharing a document folder with project team members and contacts from outside of your organisation, transmittals will be automatically prepared for them by the system when files are added or superseded in that folder. Transmittals that are automatically prepared appear in the “Pending Transmittals” folder of your project’s Transmittals Manager.
Example: Jim shares a document folder with Patricia, Steven and Phil, containing one file (A1.01 – Site and Roof Plan Version 1). The next week, Jim receives a revised version of the file (A1.01 – Site and Roof Plan Version 2) and uploads and saves it to his document folder, superseding the old version. Now, Patricia, Steven and Phil need to receive the new version of the file. Jim doesn’t have to send the new version of the file and create a transmittal for each contact manually. All Jim has to do is to review the transmittals already prepared automatically by the system and placed in the “Pending” folder of the project’s Transmittals Manager, then send all related files and transmittals at once.
To create and send all transmittals for document folder additions/new versions to all related contacts, follow the steps below.
Step 1: Create pending transmittals
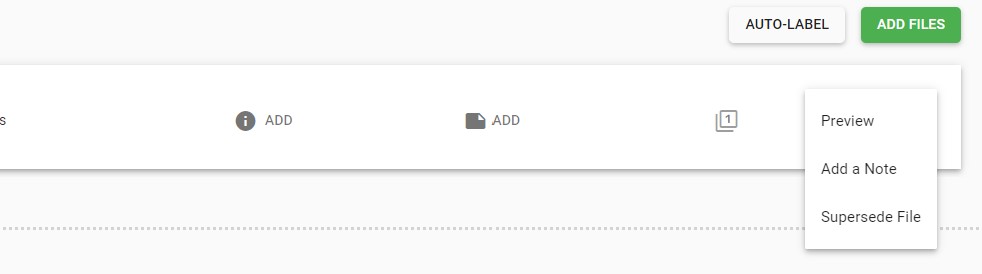
Add the new document and click “Supersede File” on the drop down menu to the left of the file name.
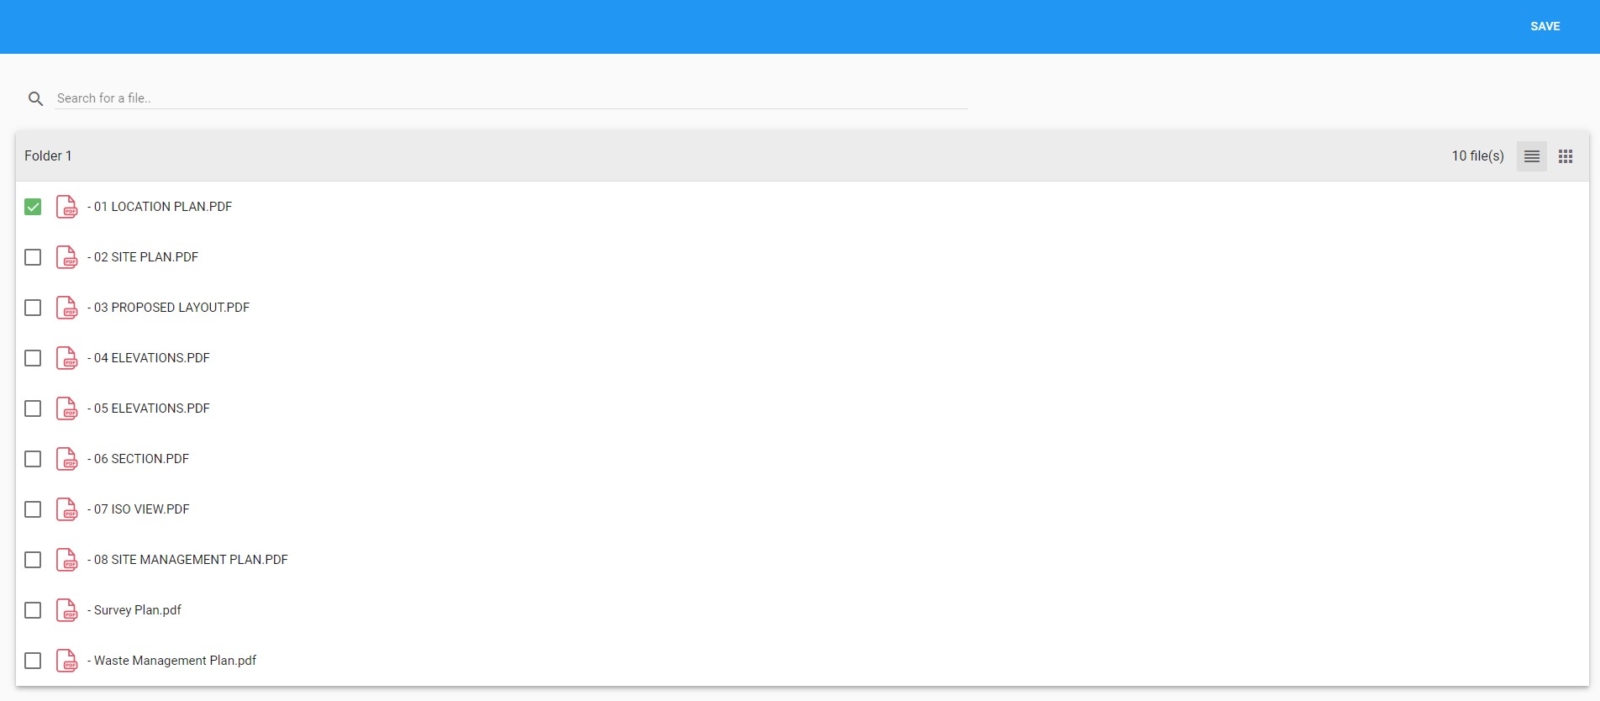
A new dialogue will open with the files already uploaded. Select the file that you want to supersede and click the “Save” on the top right hand corner.
The new document will appear in a new page. You can add notes, add details or update status of the file, then click on the “Save” button at the bottom of the page.
Pending transmittals are then automatically created for contacts with shared access to your document folder as you add/supersede files.
Step 2: Go to your transmittals manager
Navigate to your transmittals manager to view the related pending transmittal record.
Step 3: Go to “Pending Transmittals”
Click on the “Pending Transmittals” folder.
Here you will see a list of transmittals that have been automatically prepared, but not yet sent.
The most recently prepared will appear at the top of the list, with the company name, transmittal number and related module (i.e. Document Folders or bids).
Step 4: Send pending transmittals
You can review each pending transmittals information and files by clicking on each. To send all pending transmittals at once, click the “SEND ALL” button on the top right-hand side of your screen.
After being redirected back to all transmittals, you will see a small spinner on the “Sent Transmittals” folder. This means transmittals are currently being sent in the background.
Step 5: View “Sent Transmittals” record (optional)
Click on the “Sent Transmittals” folder, then click on the related transmittal.
The most recently sent transmittals will appear at the top of the list, with the company name, transmittal number and date sent displayed.
A “viewed” date stamp is displayed which appears after recipients either download the transmittal files or view them online.
After clicking into the transmittal, you will see an “INFORMATION” and “TRANSMITTAL RECEITS” tab AND “TRANSMITTAL FILES” tab.
The “INFORMATION” tab displays the sender/recipients and other details.
“TRANSMITTAL RECEITS” tab displays the time and date stamp when the recipient downloaded the transmittal documents. You can download and save the receipt if you want by clicking the floating dots to the right of the receipt.
The “TRANSMITTAL FILES” tab displays all plans/files that relate to the transmittal. Each file can be viewed online by clicking them.
Send transmittals to contractors for plan/file changes in bid/tender packages (automatically prepared)
Send transmittals to contractors for plan/file changes in bid/tender packages (automatically prepared)
There are two scenarios where “pending” transmittals are automatically created for contractors in your bid package:
Files are superseded in a document folder related to a bid package
Additional files are added to bid Packages (via the “DOCUMENTS” tab)
Whenever either of the above happens, a transmittal will be created for all contractors invited to price a trade package.
Note: “Pending transmittals” are automatically created only for contractors that have downloaded their bid package and require updates.
Transmittals that are automatically prepared appear in the “Pending Transmittals” folder of your project’s Transmittals Manager.
Example: Ian invites A Corp and B Corp to his project’s Carpentry package. This big package contains one file (A1.01 – Site and Roof Plan Version 1). Each contractor’s related contact downloads the bid package accordingly. The next week, Ian receives a revised version of the file (A1.01 – Site and Roof Plan Version 2) and uploads it to his document folder, superseding the old version. Ian then goes into his Carpentry bid package and adds “A1.02” in the documents tab. Now A Corp and B Corp need to receive the new version of A1.01 and the additional file (A1.02). Instead of manually sending the file and creating transmittals for each contractor, Ian can view the automatically prepared transmittals from the “Pending” of the project’s Transmittals Manager, then click a button to send all related files and transmittals at once.
To send all transmittals for plan/file changes in bid packages to all related contacts, follow the steps below.
Step 1: Create pending transmittals
Add the new document and click “Supersede File” on the drop down menu to the left of the file name.
A new dialogue will open with the files already uploaded. Select the file that you want to supersede in the related bid/tender package and click the “Save” on the top right hand corner.
The new document will appear in a new page. You can add notes, add details or update status of the file, then click on the “Save” button at the bottom of the page.
Pending transmittals are then automatically created for contacts with shared access to your document folder as you add/supersede files.
Step 2: Go to your transmittals manager
Navigate to your transmittals manager to view the related pending transmittal record.
Step 3: Go to “Pending Transmittals”
Click on the “Pending Transmittals” folder. Here you will see a list of transmittals that have been automatically prepared, but not yet sent.
The most recently prepared will appear at the top of the list, with the company name, transmittal number and related module (i.e. Document Folders or Bid Packages).
Step 4: Send pending transmittals
You can review each pending transmittals information and files by clicking on each. To send all pending transmittals at once, click the “SEND ALL” button on the top right-hand side of your screen.
After being redirected back to all transmittals, you will see a small spinner on the “Sent Transmittals” folder. This means transmittals are currently being sent in the background.
Step 5: View “Sent Transmittals” record (optional)
Click on the “Sent Transmittals” folder, then click on the related transmittal. The most recently sent transmittals will appear at the top of the list, with the company name, transmittal number and date sent displayed.
A “viewed” date stamp is displayed which appears after recipients either download the transmittal files or view them online.
After clicking into the transmittal, you will see an “INFORMATION” and “TRANSMITTAL RECEITS” tab AND “TRANSMITTAL FILES” tab.
The “INFORMATION” tab displays the sender/recipients and other details.
“TRANSMITTAL RECEITS” tab displays the time and date stamp when the recipient downloaded the transmittal documents. You can download and save the receipt if you want by clicking the floating dots to the right of the receipt.
The “TRANSMITTAL FILES” tab displays all plans/files that relate to the transmittal. Each file can be viewed online by clicking them.
See some examples of the transmittals interface below.
Example: Transmittal pdf file
Example: transmittal sent for plan/file changes in bid/tender packages.
Example: transmittal sent for plan/file changes in bid/tender packages – information tab.
Schedule your pending transmittals to send automatically
Schedule your pending transmittals to send automatically
As pending transmittals accumulate after updates to document folders and bid/tender packages, project team members can opt to schedule a time of day for them to be automatically sent to all related contacts.
To schedule your project’s pending transmittal distribution, follow the steps below.
Step 1: Go to the transmittals manager
Navigate to your transmittals manager. For setting up the “AUTO SEND” function, see Step 3.
Step 2: Viewing “Pending Transmittals”
You can view the items in the “Pending Transmittals” folder. Here you will see a list of transmittals that have been automatically prepared, but not yet sent.
The most recently prepared will appear at the top of the list, with the company name, transmittal number and related module (i.e. Document Folders or Bids/Tenders Folders).
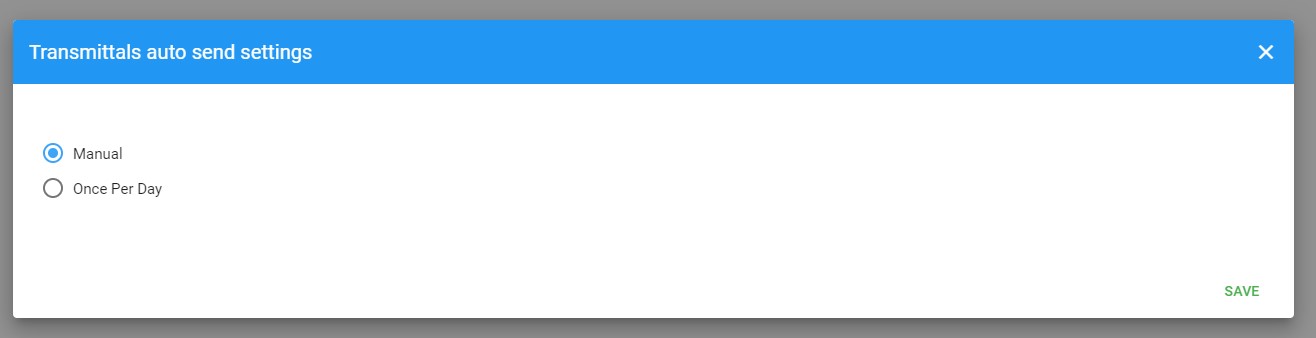
Step 3: Select the “AUTO SEND” function
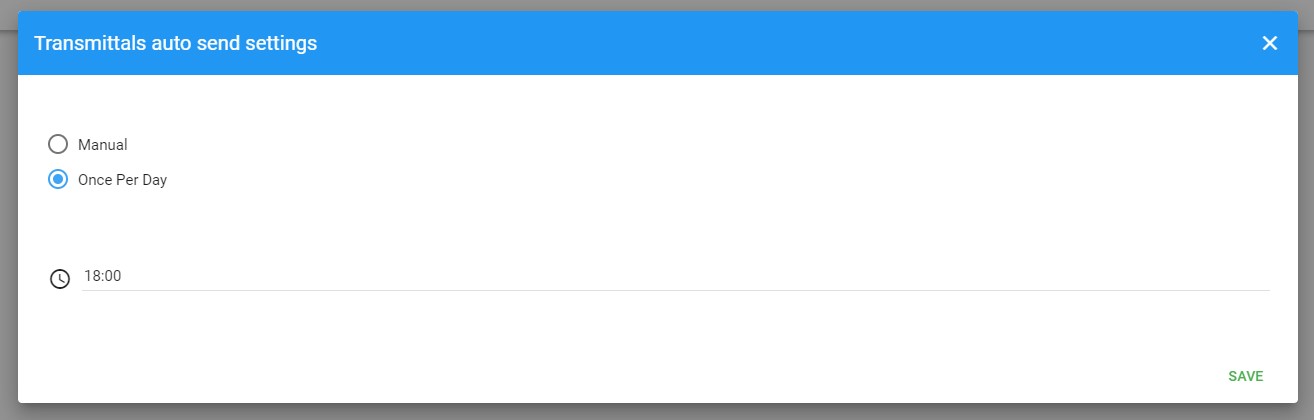
To select the “AUTO SEND” function, click on the “AUTO SEND” button on the top right hand side. A new dialogue will open to give you the option of selecting “Manual” transmittal or “Once Per Day” transmittal.
Click the “Manual” button to send transmittals manually, or the “Once Per Day” button.
Step 4: Select a time and save
If you select the “Once Per Day” option, then select the time picker below to set a time of day when transmittals are to be automatically sent to recipients.
After selecting a time, click the “SAVE” button.
Resend a transmittal
Resend a transmittal
To re-send a transmittal, follow the steps below.
Step 1: Go to the transmittals manager
Navigate to your transmittals manager.
Step 2: Go to a transmittals folder
Click on the “Sent” or “Received” transmittals folder (depending on the location of the transmittal you wish to re-send).
Step 3: Click the overflow button
Click the overflow button on the right-hand side of the related transmittal block, then select “Resend” from the menu.
Export a transmittal
Export a transmittal
To export a transmittal, follow the steps below.
Step 1: Go to the transmittals manager
Navigate to your transmittals manager.
Step 2: Go to a transmittals folder
Click on the “Pending”, “Sent” or “Received” transmittals folder (depending on the location of the transmittal you wish to export).
Step 3: Click the overflow button
Click the overflow button on the right-hand side of the related transmittal block, then select “Export” from the menu.
Critical Path Method (CPM) is a defining resource for the construction industry. First developed in the late 1950s, the critical path method has been utilised in a variety of project development projects including engineering, aerospace and plant maintenance. CPM has rapidly become an essential staple for construction projects today, but many business owners are intimidated from what is perceived as a complex process.
https://www.webuildcs.com/wp-content/uploads/Scheduling_blog_thumbnail-copy.jpg7491123WeBuildhttps://www.webuildcs.com/wp-content/uploads/webuild-logo-R.pngWeBuild2023-04-05 11:18:322023-08-25 03:53:29Critical Path Method: Simplifying the process for your construction business
The value of As Built drawings is often underrated, especially their importance for the efficient management of the project after construction has been completed. This article takes a brief look at As Built drawings; what they are, how they are created and why they are important.
https://www.webuildcs.com/wp-content/uploads/A-guide-to-As-Built-Drawings.png315560WeBuildhttps://www.webuildcs.com/wp-content/uploads/webuild-logo-R.pngWeBuild2023-04-04 12:37:002023-07-23 10:09:39A Guide To Construction As Built Drawings
The customary monthly clients meeting is a time when you have the chance to give your clients progress updates about their project and provide them with a monthly report. Your monthly report says a lot about your professionalism and should not be rushed or overlooked. It is an ideal way to instill confidence in your clients about your company’s ability to communicate, and to demonstrate that you have a solid understanding of their project and their priorities.
https://www.webuildcs.com/wp-content/uploads/How-to-prepare-the-best-construction-client-report.png315560WeBuildhttps://www.webuildcs.com/wp-content/uploads/webuild-logo-R.pngWeBuild2023-04-03 11:35:132023-07-23 10:07:42How to prepare a great construction client report (Infographic)